

Create Tags using Excel Bulk Load Tool
To create a tag and collect data it requires bare minimal properties to have a valid value in the tag configuration list. If needed, see tag definitions and properties to consider for tags where redundant data collection is supported.
Creating tags using Excel bulk load tool
Excel-plugin
Usually, the amount of tags is large, and it might be beneficial to use Microsoft Excel ™ to populate the database instead of using Engineering UI. There is an Excel-plugin available to do this. These instructions cover the usage of the Excel-plugin from Windows 2008 R2 server, which has History installed.
Pre-requirements
A pre-requirement of running the Excel-plugin is to have Excel and the related license installed. These instructions have been written using Microsoft Office Standard 2010 (64-bit version).
All the Excel-plugins that are working on top of VtrinLib (like Tag Excel Populate) also work using the 64 bit Excel version. Some older Excel-plugins that are on top of ODBC only work with 32 bit Excel Versions, as the History ODBC interface is only running as 32 bit currently.
CAUTION: The Excel application does not work with elevated (administrator) privileges. Instead, the Populate or Start button just causes a message "Can't create object (ABB.cExcelPopulate)" in the Excel status bar.
If the Windows User Account Control (UAC) is disabled and you have administrator privileges, running Excel without elevated privileges is not possible in which case there is a workaround to register the ExcelPopulate.dll com interop with the following commands:
C:\Windows\Microsoft.NET\Framework64\v4.0.30319\RegAsm.exe d:\rtdbdata\VtrinShared\XL\ExcelPopulate.dll /codebase
C:\Windows\Microsoft.NET\Framework\v4.0.30319\RegAsm.exe d:\rtdbdata\VtrinShared\XL\ExcelPopulate.dll /codebase
Note: replace d:\rtdbdata with your actual database directory in case it is different
Working with Excel
The easiest way to open the bulk load tool is by browsing to the folder %APP_DATAPATH%\VtrinShared\R (e.g., D:\RTDBData\VtrinShared\R) and double-clicking the Excel Populate.xls file. The window that opens (after enabling the macros) should be similar to the following figure.
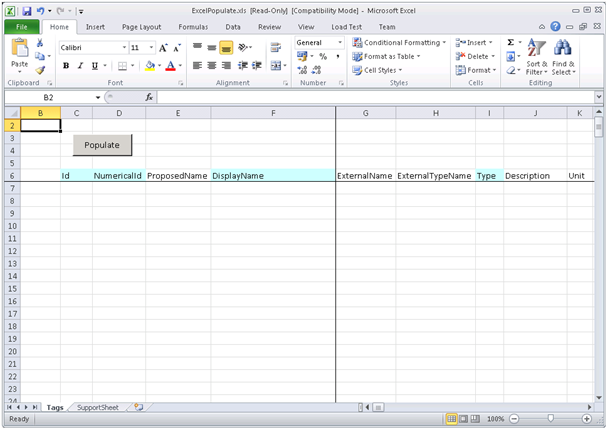
There are two sheets visible: "Tags" and "SupportSheet". The support sheet only contains some internal configuration information and should be automatically populated correctly at the startup. The most important information in "SupportSheet" is the "dll directory" that should point to %APP_DATAPATH%\VtrinShared\XL. Usually, the user is not required, and shouldn't, modify the data available in "SupportSheet". The top-most sheet is "Tags", which is the place where bulk-population is done.
Populating tags is started by pressing the "Populate" button. This opens the dialog similar to the following image.
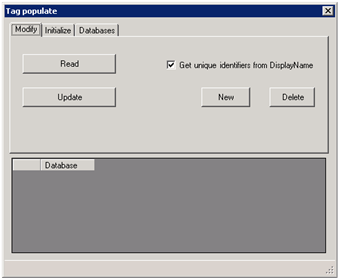
There are three tabs in the populate dialog: the "Modify" tab is used to create or delete tags, and to fetch or modify the existing tags. The tag bulk-load tool is bi-directional, and its user should always remember that History database is a master for the configuration, and the Excel sheet is only one application to access that information.
The "Initialize" tab is used to declare which Tag class properties are visible in the Excel sheet. The 'Read' button is used to restrict the set of tags that are fetched from the database. In the very first phase, the content of this tab is not needed.
The "Databases" tab, although the last one, is the one to get started with. Without first defining the database to connect to, it is impossible to get tags populated. If one tries e.g., to read tags from the database before connecting, a dialog "No databases defined" would pop up. Pressing the "Add" button in the "Databases" tab pops up the logon box familiar from the Engineering UI user interface. The "Databases" tab, as it appears after a successful connection, is illustrated in the following image.
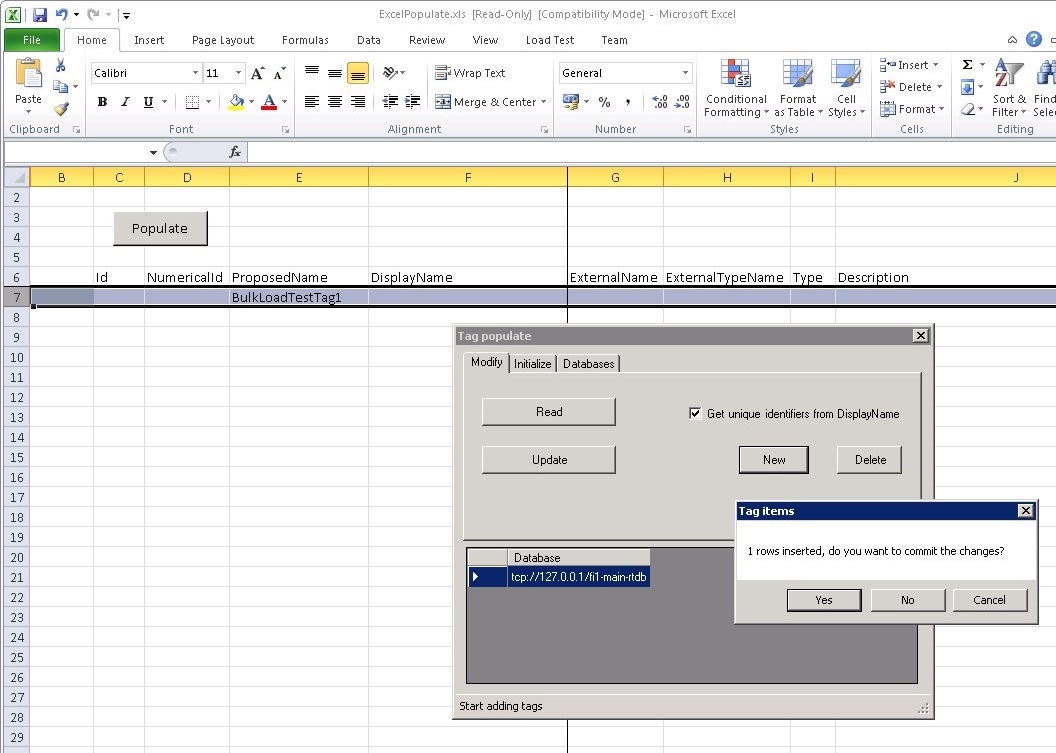
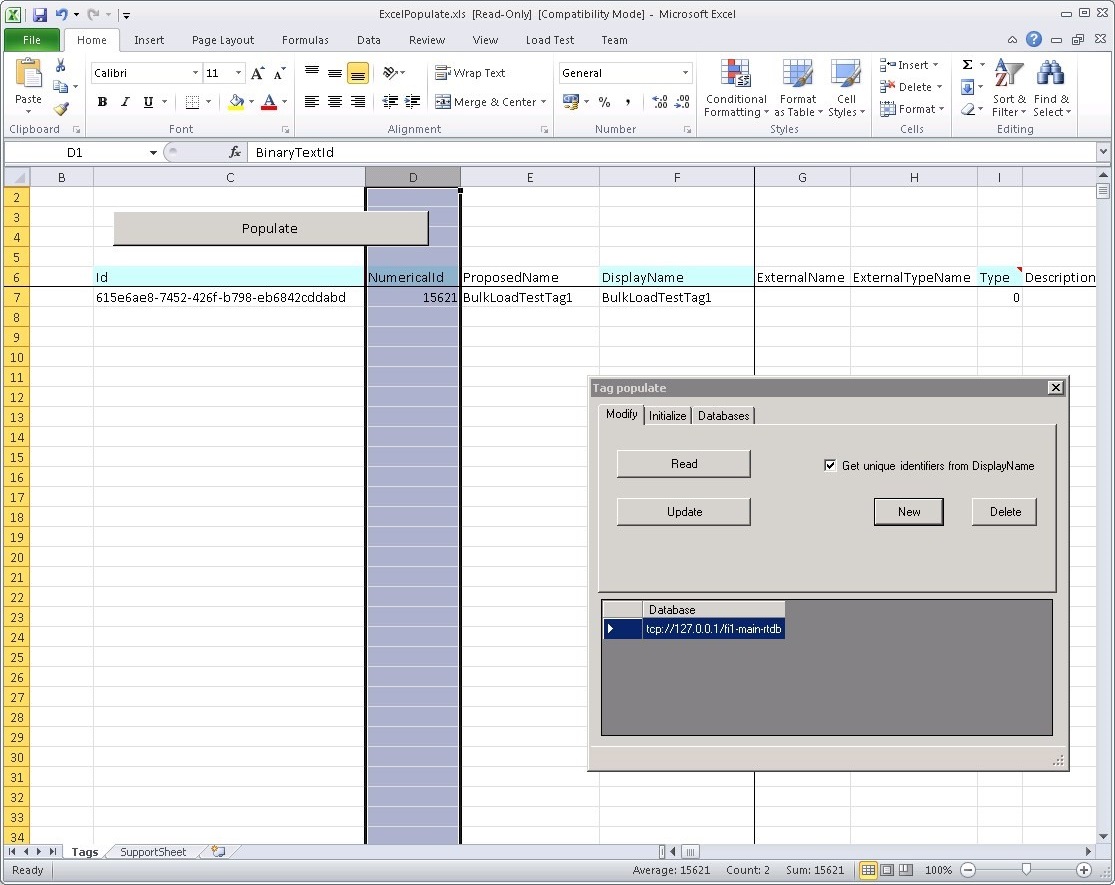
After creating the tag, it can be modified either by using Engineering UI or the Excel bulk load tool. Modifying using Excel is done by modifying the selected properties and pressing the "Update" button. Deleting tags is done using the "Delete" button. Without selecting any rows, all tags in Excel will be deleted, so selecting one or more rows before deleting is often required. Note that after deleting the selected tags, the Excel bulk load tool removes the content of the "Id" and "NumericalId" properties, but leaves other properties on the sheet. If these are not needed, they can be deleted using the normal Excel "delete row" operation.
The "Read" button from the "Modify" tab can be used to fetch tags, as well as the changes are done using Vtrin or ODBC interface, back to Excel.
Updated 10 days ago