

Onboarding ABB Ability™ History on Edgenius OS
Step by step guide of ABB Ability™ History installation to Edgenius OS
ABB Ability™ History on Edgenius
ABB Ability™ History on Edgenius is a containerised application that runs on ABB Edgenius OS and is integrated with the Edgenius services. The application deployment uses Edgenius tooling for installation and lifecycle management.
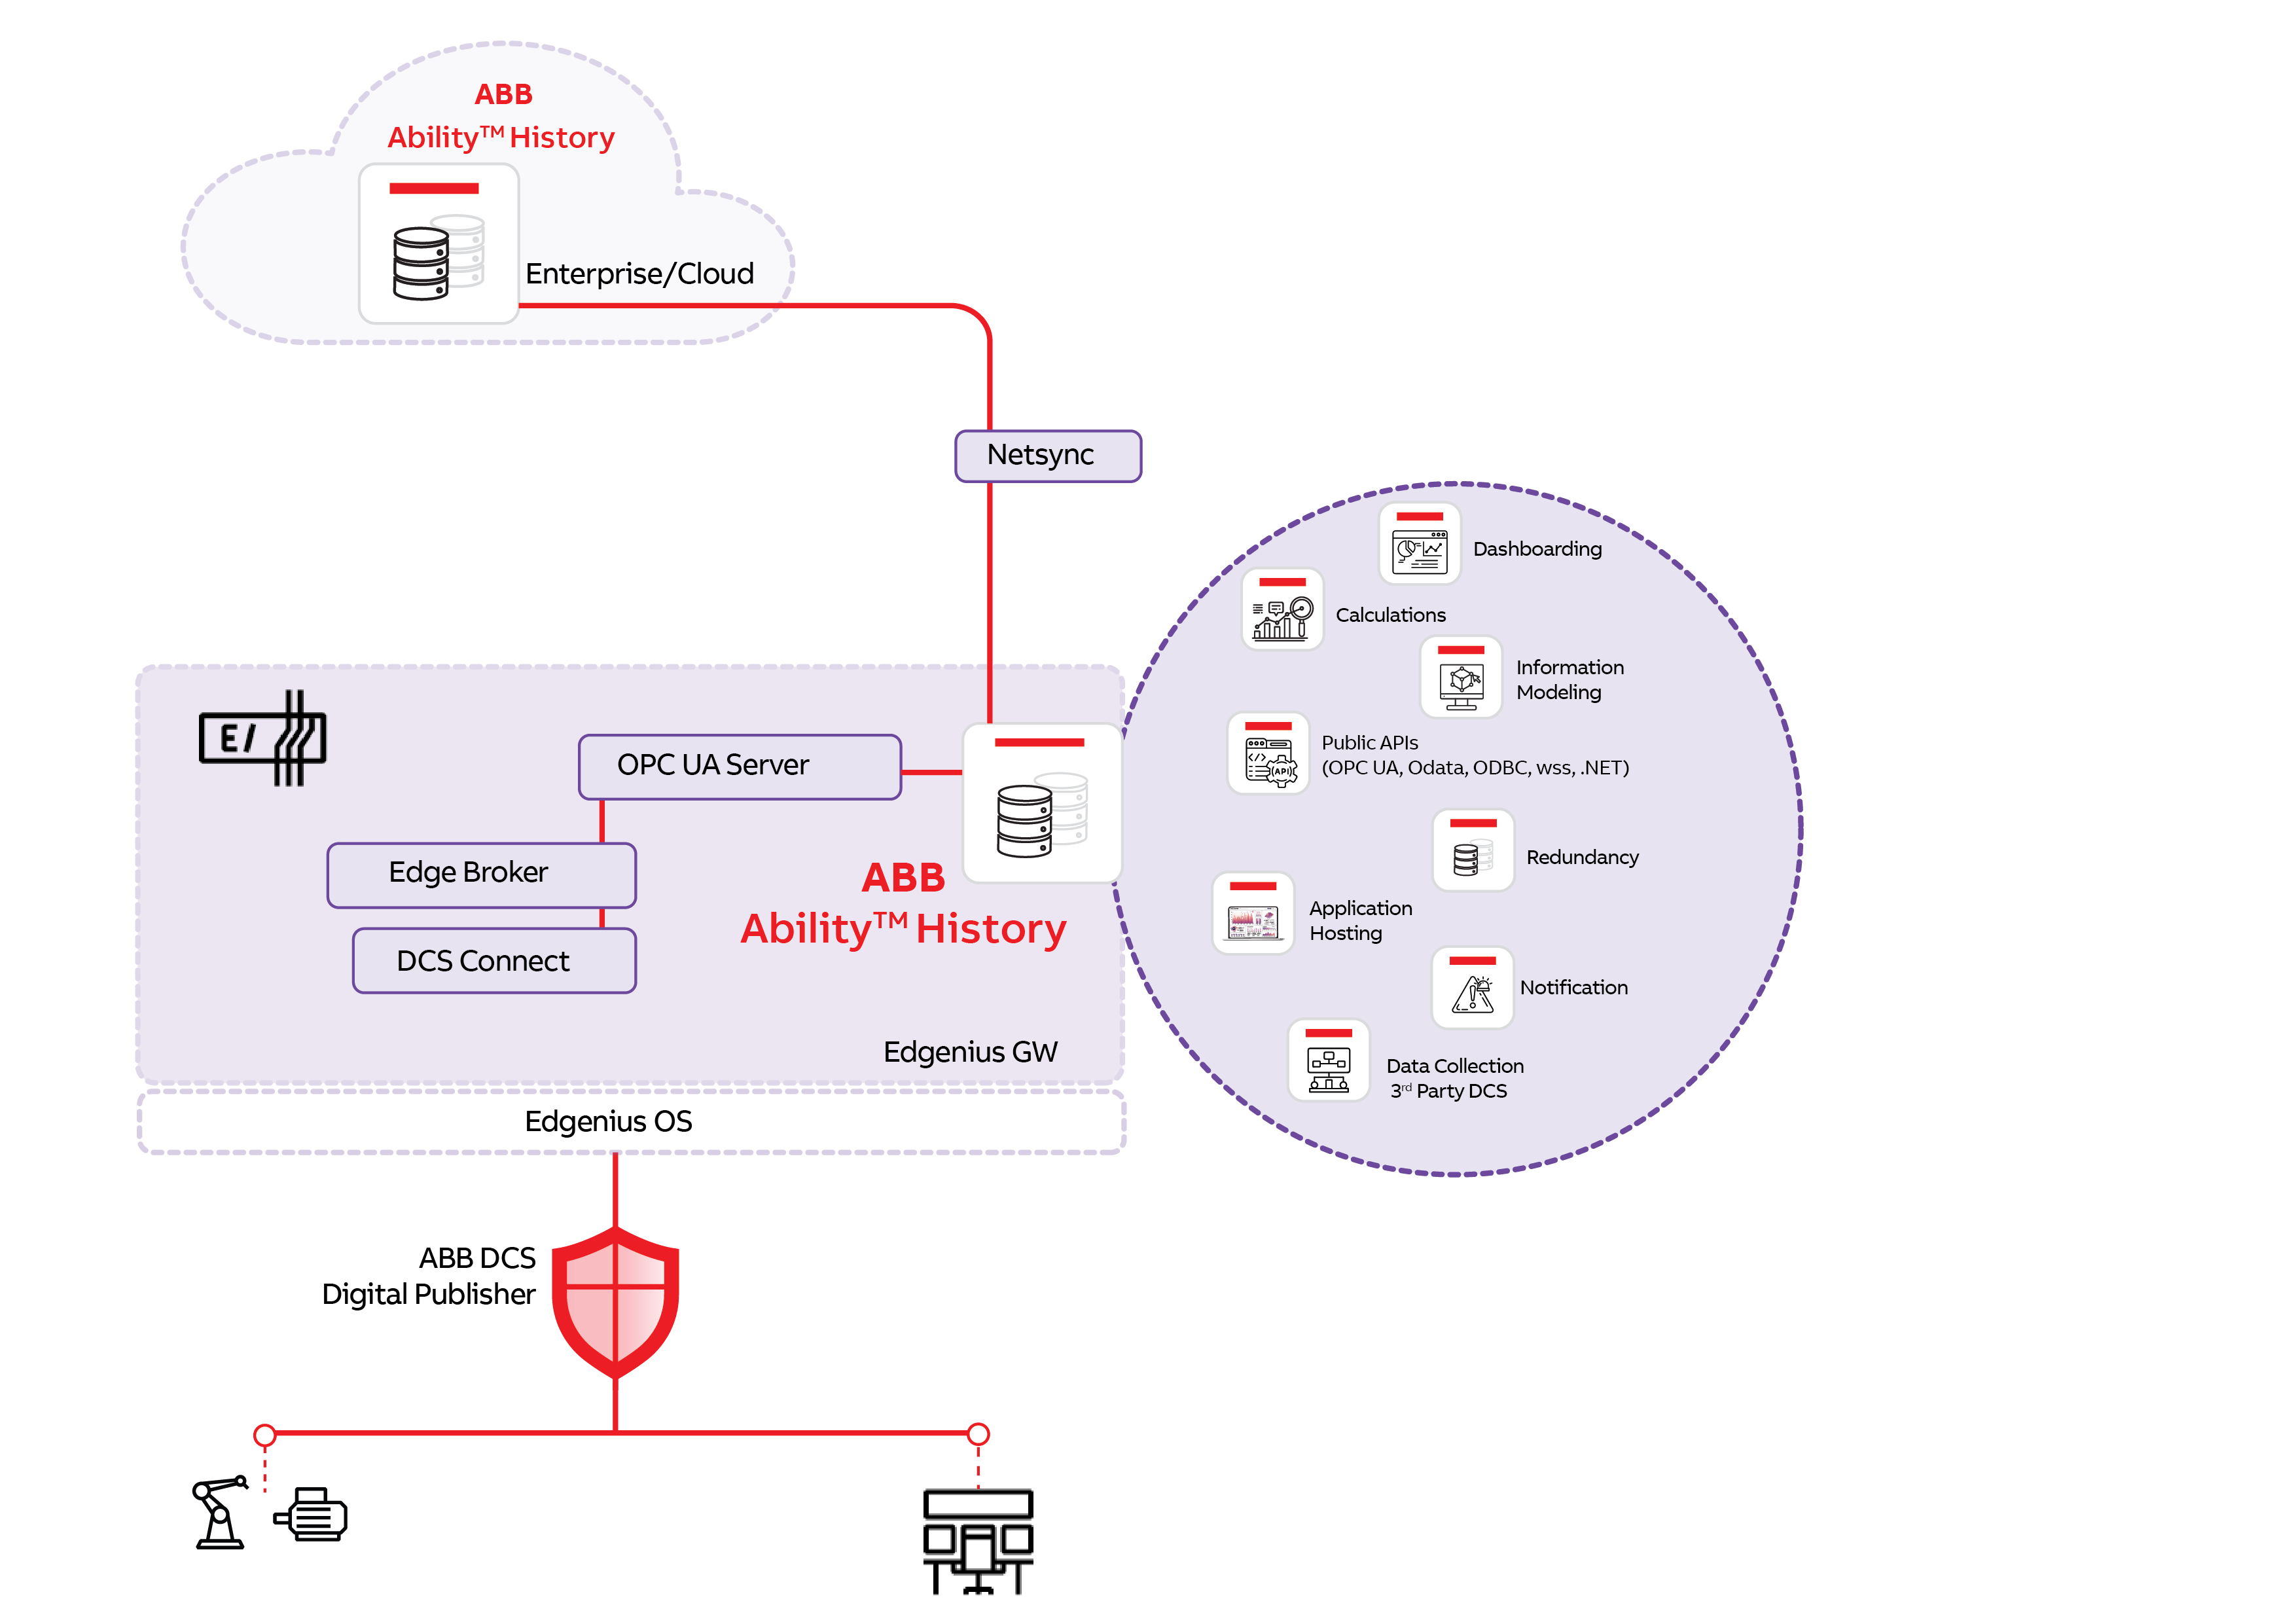
The integration with Edgenius OS services allows ABB Ability™ History to function as a native part of the edge environment. The integration points are User ID management (It links with Edgenius security services to provide consistent user authentication from Keycloak), Edgenius OPC UA Server (collecting data from ABB DCS Connect to ABB Ability™ History), and deployment management (Edge Management Portal).
With the integration architecture established, the next step is to ensure that the target Edgenius OS environment is prepared for deployment. The following prerequisites define the minimum hardware and software requirements necessary for a successful installation and operation of ABB Ability™ History.
Prerequisites:
Before onboarding ABB Ability™ History on Edgenius OS, ensure the edge environment meets the following requirements.
Validate all prerequisites before starting the onboarding process. Proper sizing and configuration are critical for optimal performance, scalability, and reliability of ABB Ability™ History services on ABB Edgenius OS.
Hardware Requirement:
CPU: Minimum 2 cores
RAM: Minimum 8 GB
Storage: 300 GB** SSD for Edgenius OS and required base software (as required by Edgenius OS)
Additional storage: Minimum 100 GB per pod for ABB Ability™ History
Refer to the ABB Ability™ History Sizing Documentation for detailed storage guidelines and to determine the appropriate disk size based on your workload and data retention requirements.
Software & Platform Requirement:
Follow the reference links below to install and configure Edgenius OS and the related components.
Note:
800xA Publisher, CS Connect, and OPC UA Server are optional components. Install them only when data needs to be retrieved from 800xA Control System through the Edge components.
References:
- Edgenius System Planning
- Edgenius OS Installation
- Post Installation
- Edgenius Management Portal
- 800xA Publisher
- CS Connect
- OPCUA Server
Increase Memory Map Limit:
To use large databases, increase the memory map limit. A database containing more than a few hundred variables is considered large for this configuration.
Configure this setting on the worker node. The configuration cannot be performed from within the pod.
Run the following commands on the worker node with root privileges:
#This command changes the parameter for the running system.
sysctl -w vm.max_map_count=2147483647
#This command makes the parameter persistent across reboots
echo "vm.max_map_count=2147483647" >> /etc/sysctl.d/cpmplus.conf
Keycloak Configuration
To enable secure authentication for ABB Ability™ History, access the Keycloak portal and configure the required client within the Edgenius environment.
-
Access Keycloak Portal: Ensure the Keycloak DNS entry is added to your system’s hosts file
<IP-Address>   idp.<EdgeName>
Where
IP address is the Node IP address
EdgeName is Hostname of the node
Open a browser and navigate to the Keycloak URL and log in using the provided administrative credentials.
https://idp.<EdgeName>/admin/master/console/ ex: https://idp.edgeniusos/admin/master/console/ -
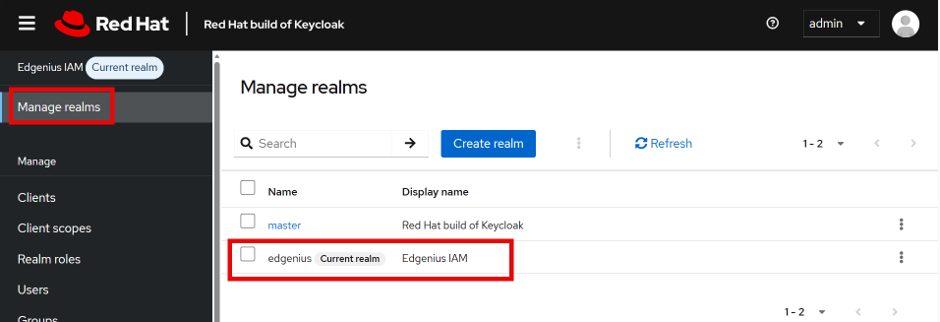
After logging in to the Keycloak portal, navigate to Manage Realms. The portal displays two realms, Master and Edgenius. Select Edgenius to make it the active realm, as illustrated in the screenshot below.
-
Create a new Group, User and Client in Edgenius Realm:
Group and User Creation: -
Once switched to the Edgenius Realm.
-
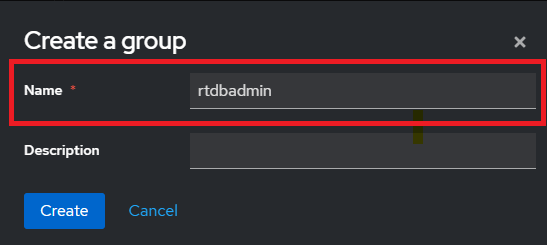
Create a new group called 'rtdbadmin' as shown in the screenshots below.
-
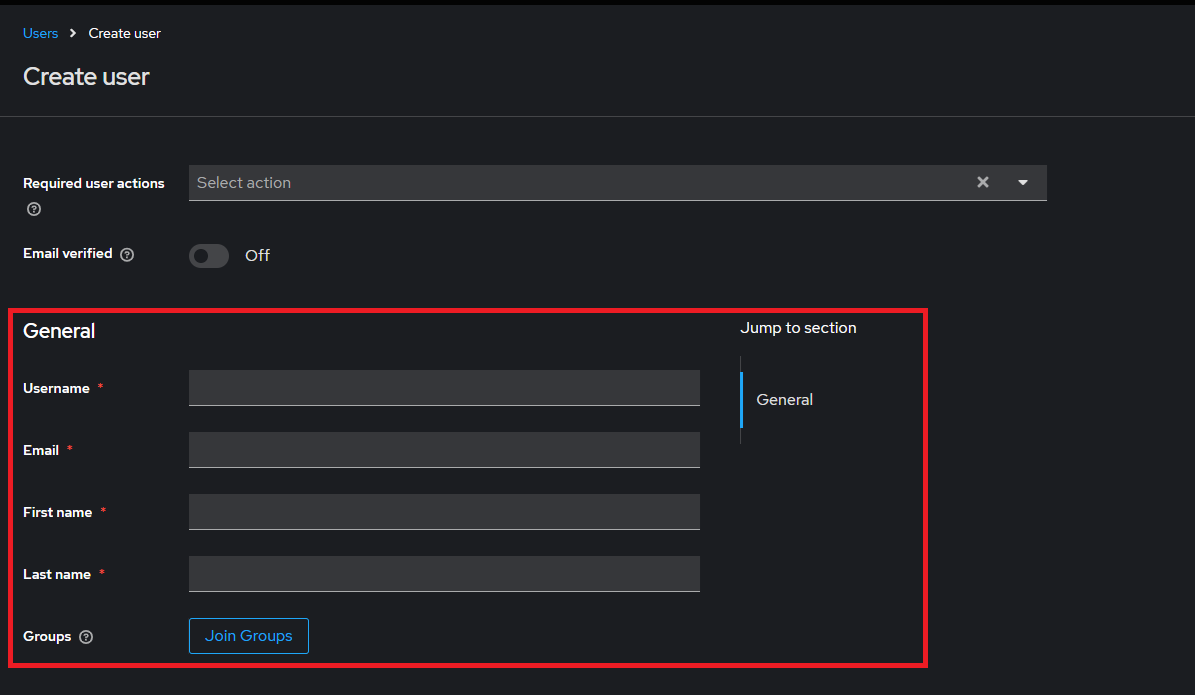
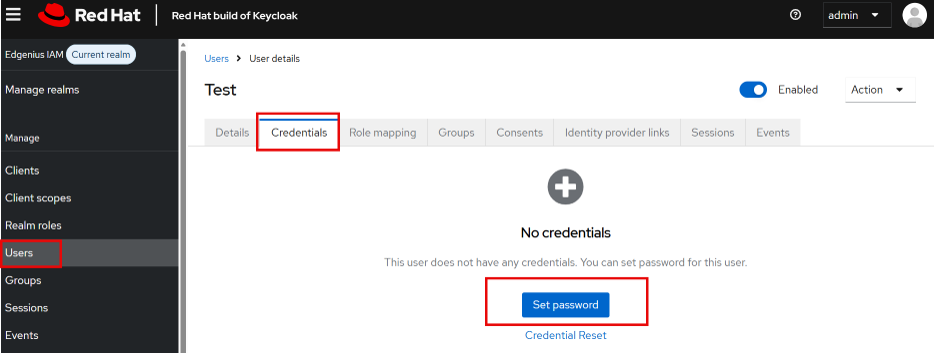
Navigate to users list and create a new user and enter Username, Email, First name, Last name and click on 'Join Groups' and assign it to the 'rtdbadmin' group as created in the previous step. Set a password for this user so that these details can be used to login to ABB Ability™ History applications.
 Client Creation:
 -
Go to Clients and click on Create Client.
-
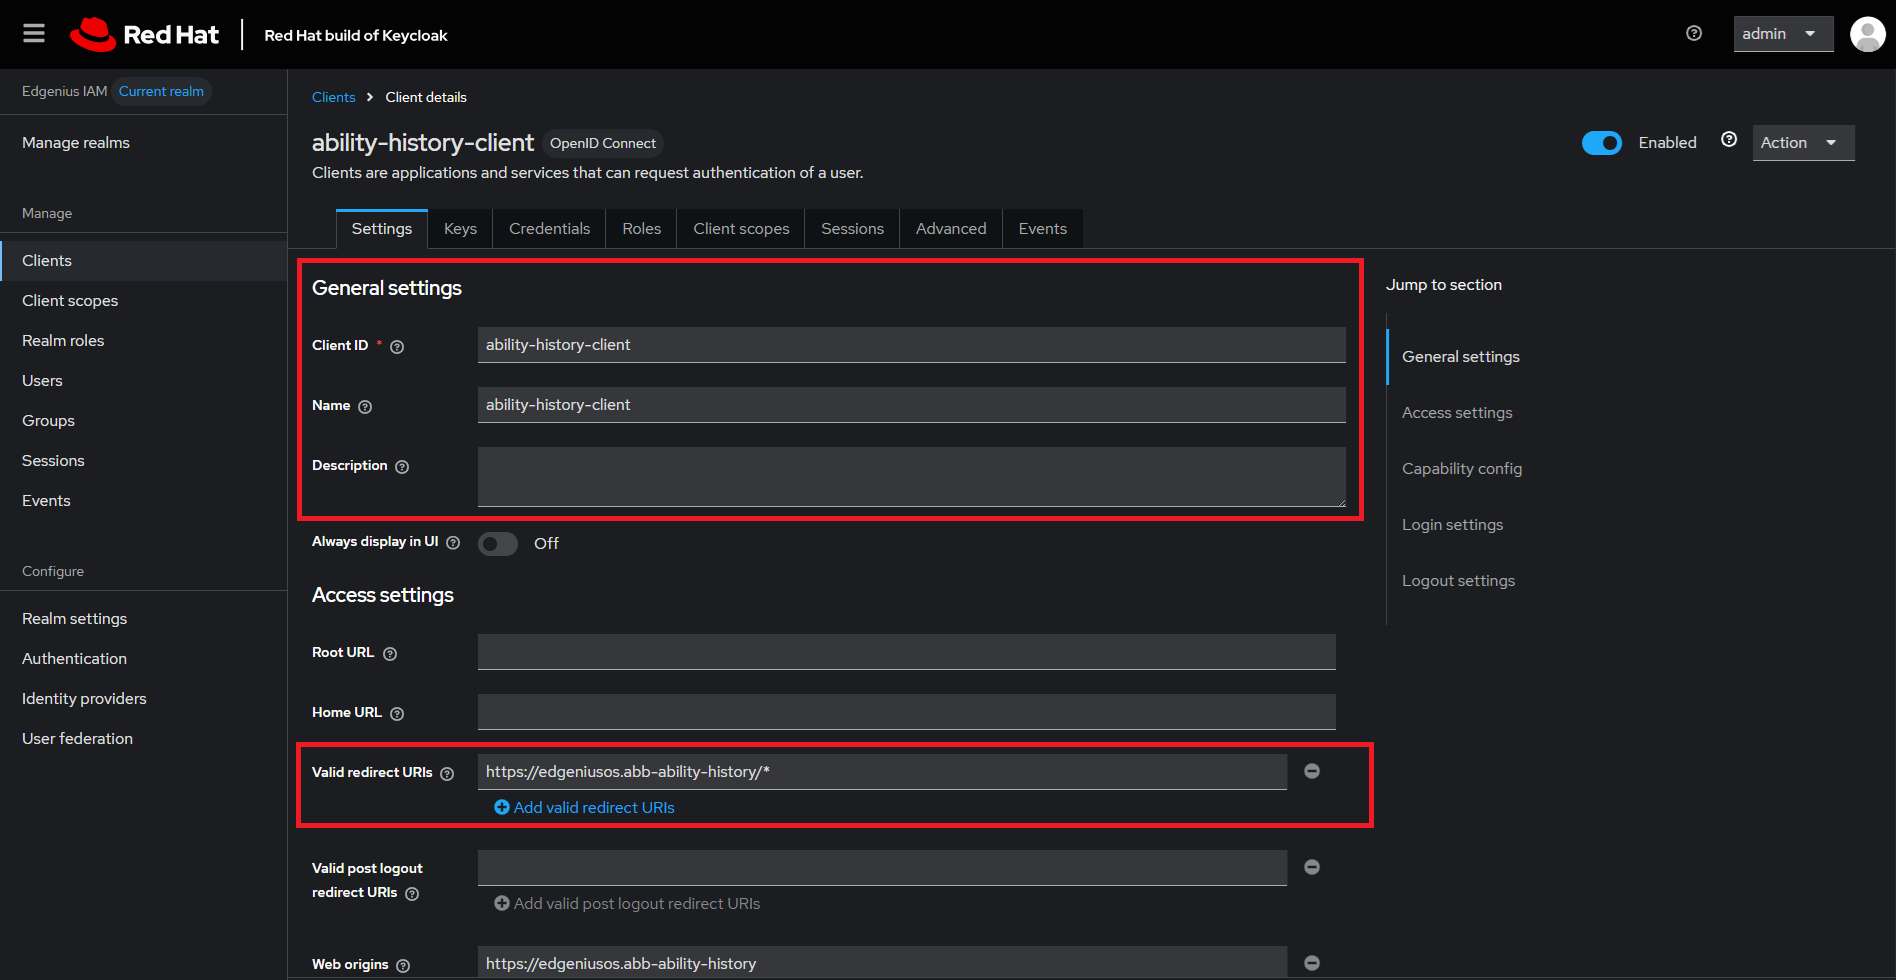
Provide the following details in General Settings:
- Client Type : OpenID Connect
- Client ID: ability-history-client
- Client Name: ability-history-client
-
Select Next button to navigate to Capability Config
- Client Authentication: On
- Select Authentication Flow as : Standard Flow, Direct Access Grants and Implicit Flow
-
Select Next button to go to Login Settings
-
Add Valid redirect URIs of ABB Ability History as below
https://<EdgeName>.abb-ability-history/* -
Click on Save button to save the client details, user can see the screen below.
-
-
Click on Credentials tab as seen in the screenshot
-
Client Authenticator as : Client Id and Secret as shown in the screenshot below

-
Extract the secret from Client Secret by clicking on Copy button as shown in the screenshot below and save it.

-
Save Client ID, Client Secret and these details will be used in configuration section during the ABB Ability™ History installation.
-
-
Click on Client Scopes tab as seen in the screenshot
-
Click on to select the 'ability-history-client-dedicated' client scope and user can see below as shown in the screenshot
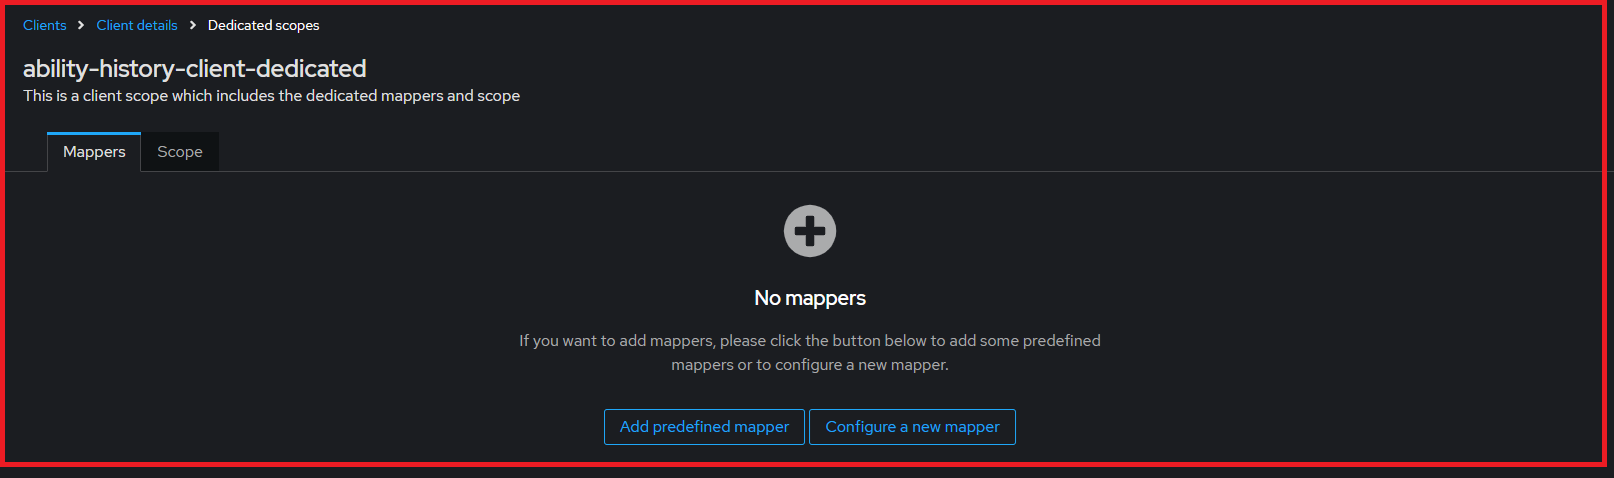
-
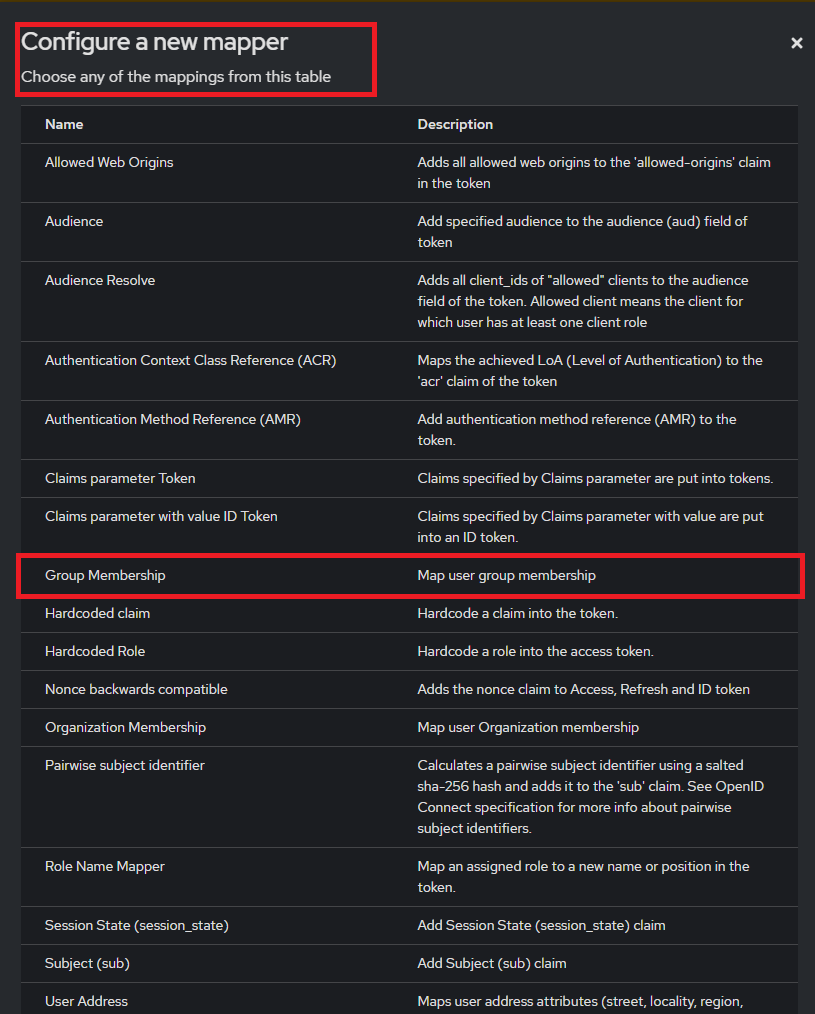
Click on Configure a New Mapper and in that select 'Group Membership' as shown in the screenshot below
-
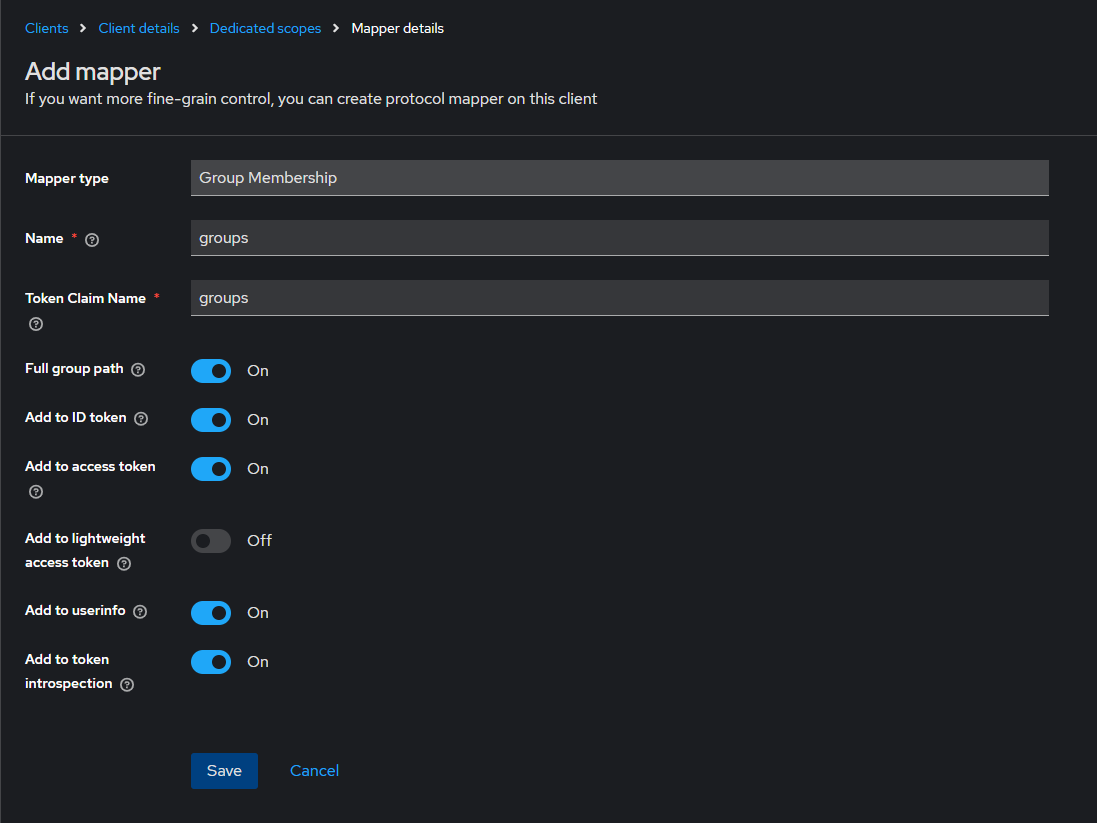
User is navigated to Mapper Details as shown in the screenshot below, provide Name and Token Claim Name as groups and save.
-
Access to Edge Management Portal:
To proceed with onboarding and management activities, ensure that you have proper access to the Edge Management Portal (EMP).
Configure Host Entry:
- Add the Edge Management Portal DNS name to the hosts file on your Windows machine.
- This ensures that the portal is accessible from your local environment.
<IP-Address>   management.<EdgeName>
Where
IP-Address is the Node IP address
EdgeName is Hostname of the node
Access the Portal:
Open a web browser and navigate to the following URL, Replace
Login to EMP:
- Upon accessing the URL, you will be redirected to the Edge Management Portal login page.
- Enter your credentials to log in and access the portal.
Note:
- Ensure network connectivity between your Windows machine and the Edge VM.
- Verify that the DNS entry or hosts file configuration is correct if the page does not load.
- Refer to the screenshots below for a visual reference of the EMP login page.
https://management.<EdgeName>/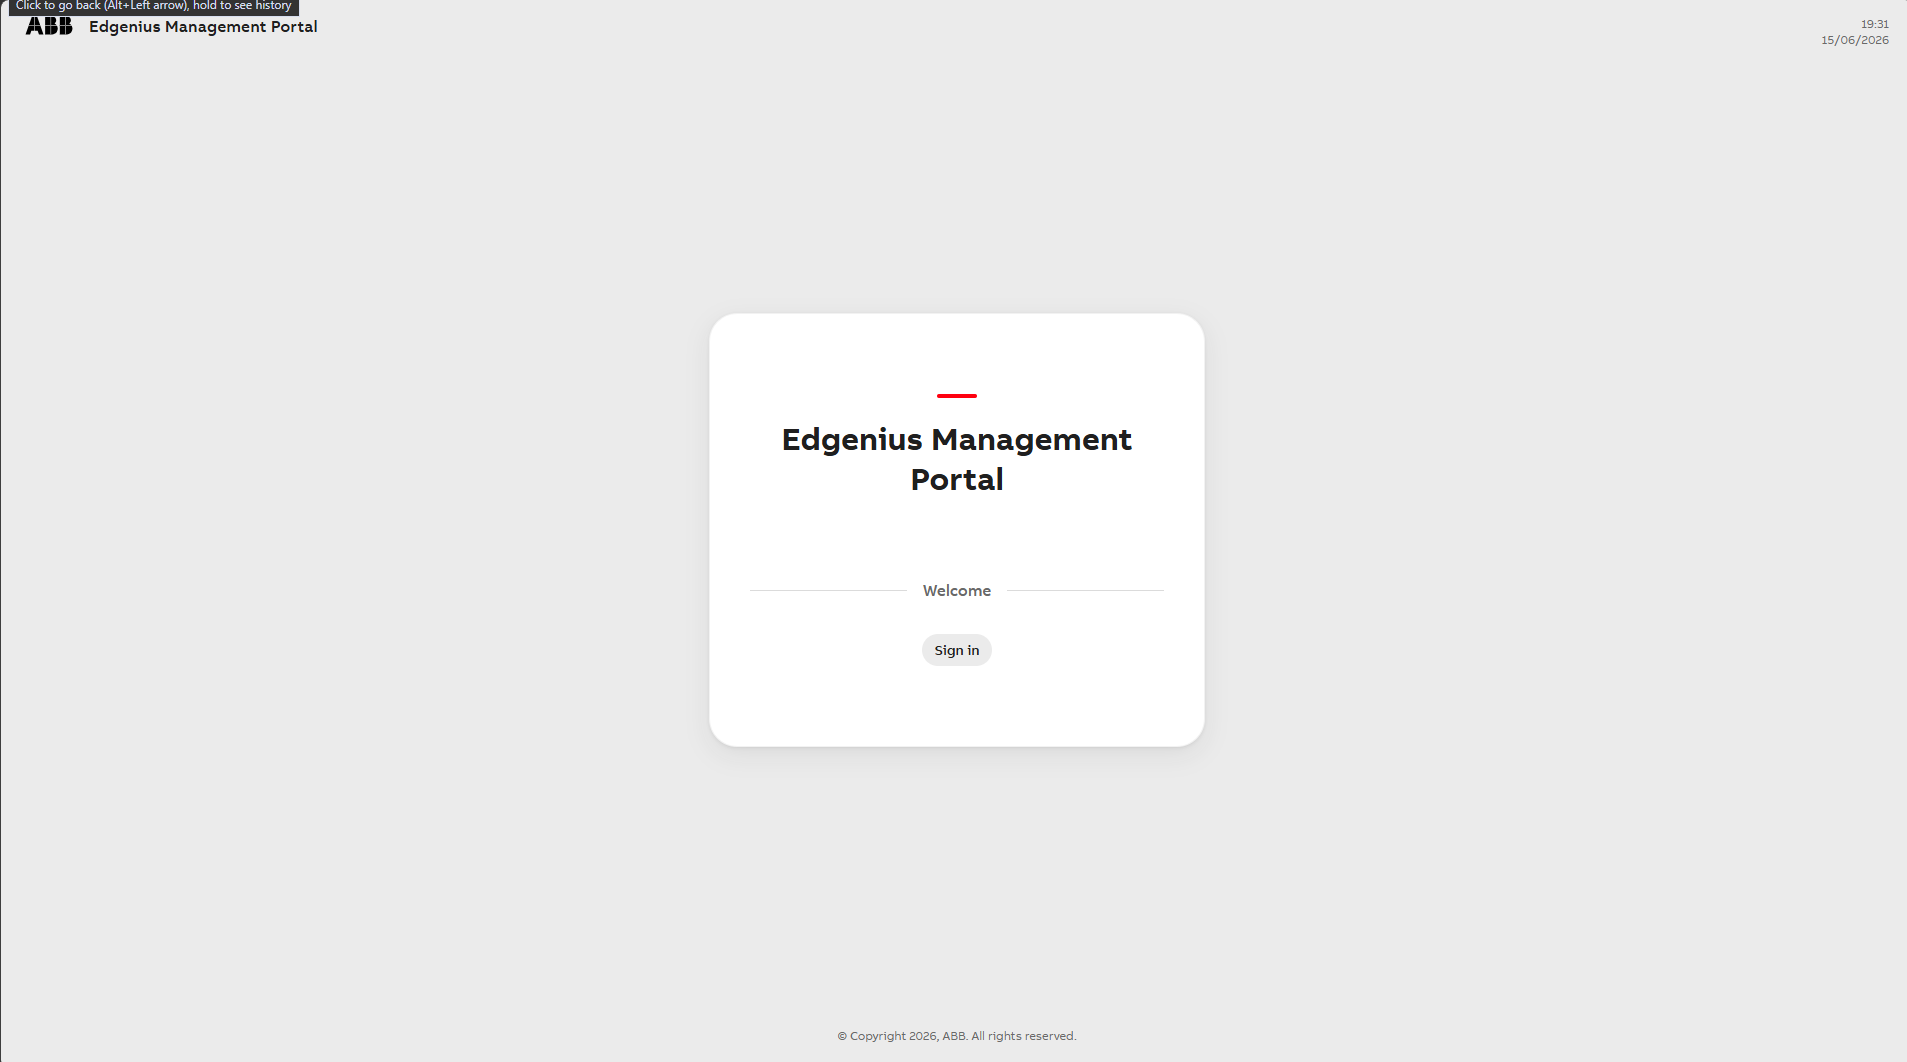
Hauler Package Requirements:
To deploy ABB Ability™ History on Edgenius OS, the required Hauler packages must be obtained in advance. These packages contain the necessary container images and deployment artifacts needed for installation in a controlled or offline environment.
Request Hauler PackageCreate a service Ticket: Create a request for hauler package in
ABB Ability™ History Support
Note:
- Always use the latest recommended Hauler package versions to ensure compatibility and security.
- Verify package integrity and completeness before proceeding with deployment.
- Ensure alignment between the Hauler package version and the target Edgenius OS environment.
Load ABB Ability™ History Hauler Package into Edge Management Portal:
Login to the Edge Management Portal and user can see a screen below as shown in the screenshot below.
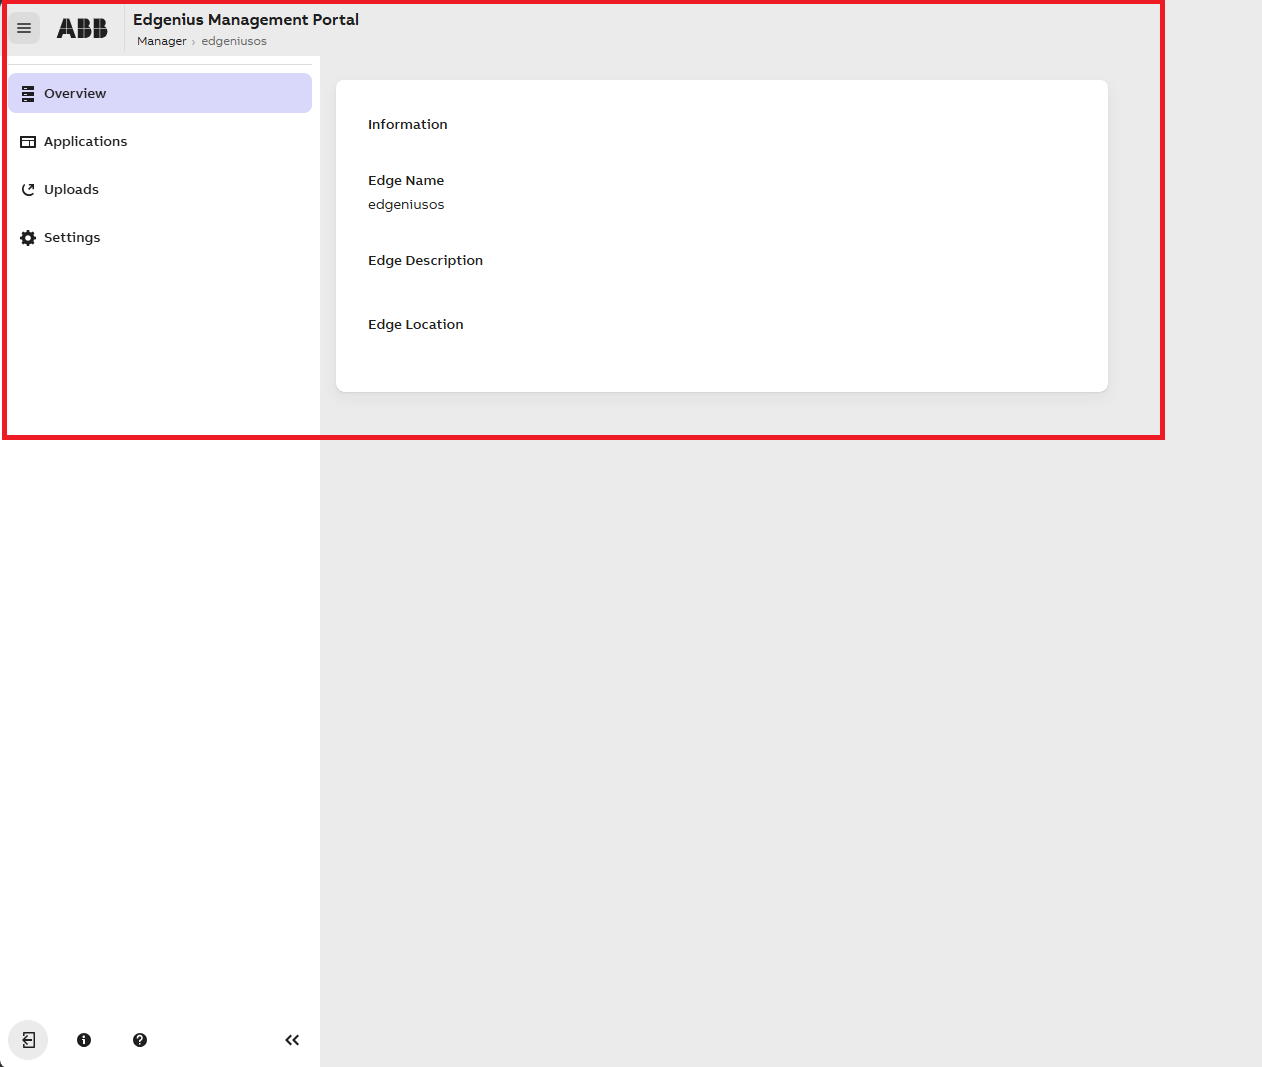
Extract the hauler package as requested in the previous step which contains the .zst file and .sig files.
To access the upload functionality, click the Uploads button shown in the screenshot. This action opens the Uploads screen, shown in the screenshot below.
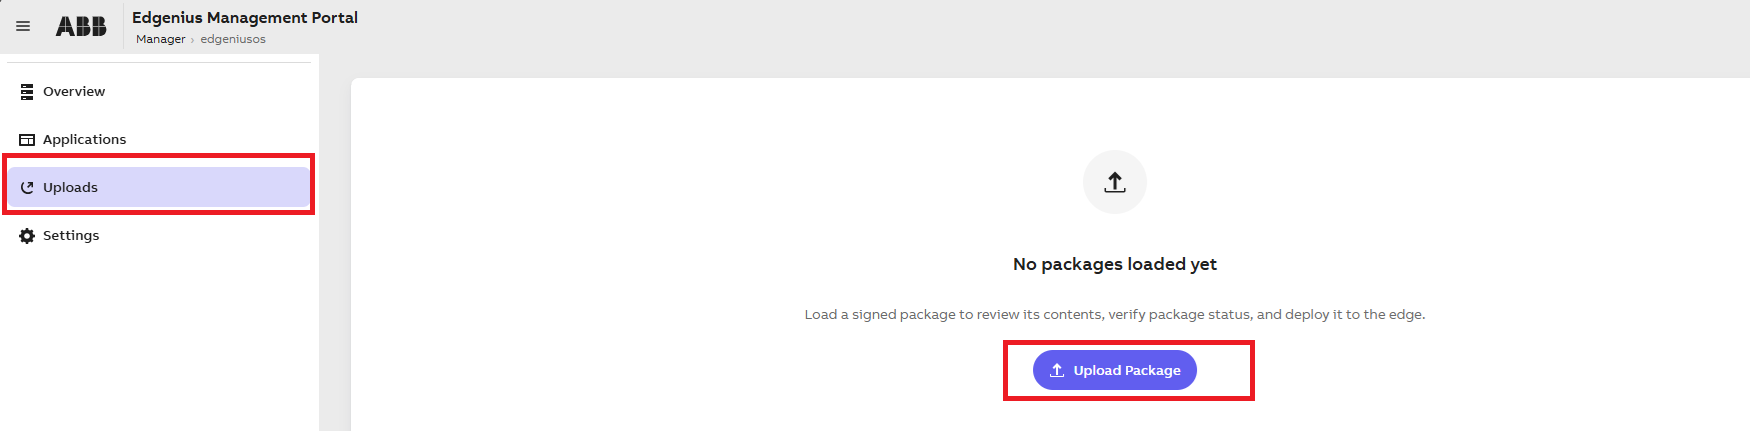
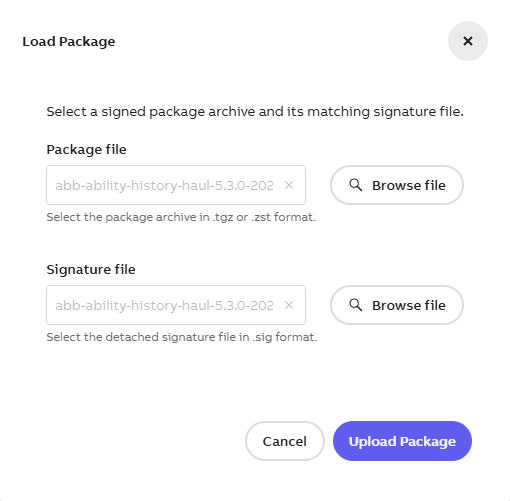
Click the Upload Package button. A dialog box appears, prompting the user to select the .zst and .sig files. Choose the files extracted in the previous steps, and then click Upload Package to begin the upload process.
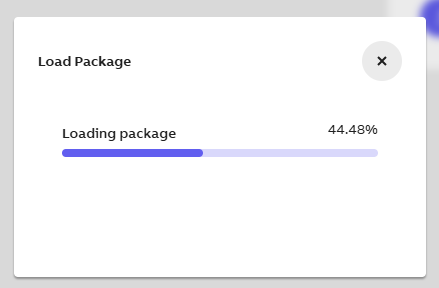
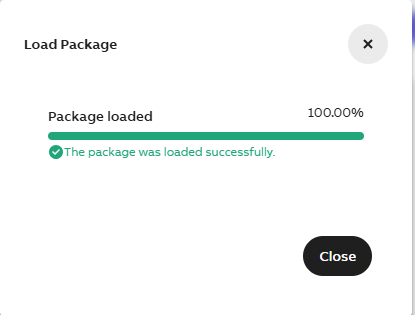
During the upload, the user can monitor the progress through the upload status indicator. Once the upload completes successfully, a confirmation message is displayed. The uploaded package is then listed under Application Packages.
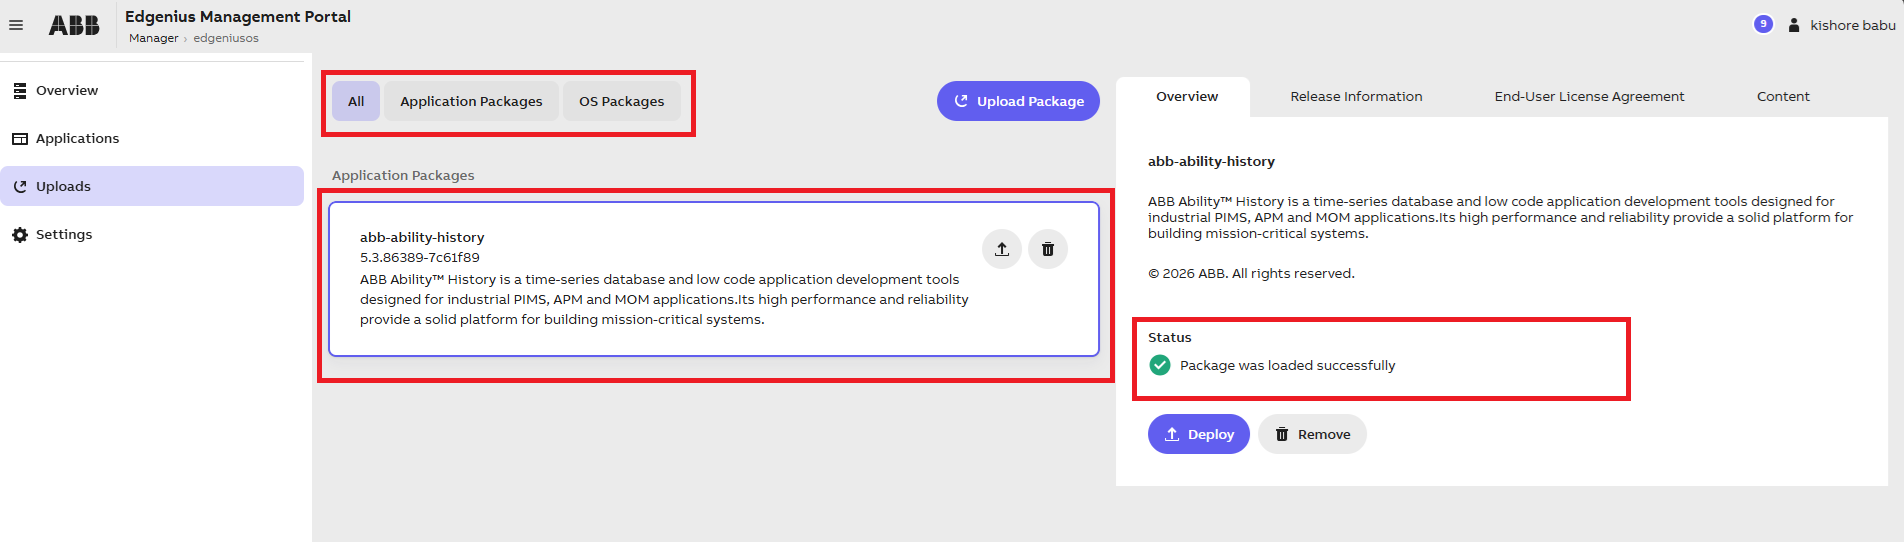
Review the upload status of a selected package in the details pane. A status of "Package was loaded successfully" indicates that the package has been uploaded and is ready for deployment.
Packages that are signed using valid and trusted certificates are displayed with a green indicator label.
User can view the list of uploaded packages, including package name, version, and description.
Filter uploaded packages using the All, Application Packages, and OS Packages tabs.
Deploy Hauler Package into Edge Management Portal:
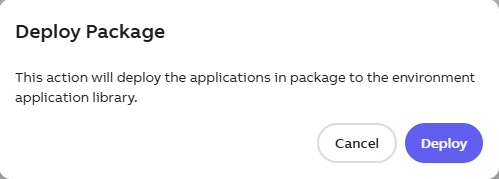
Click on Up arrow to deploy the package, user will be prompted with the popup below, click on Deploy button to deploy the app.
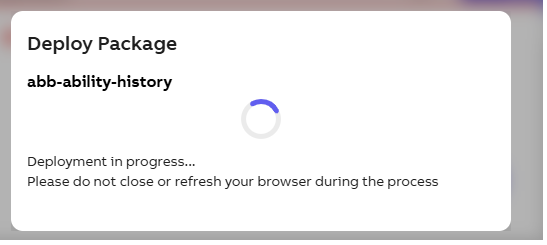
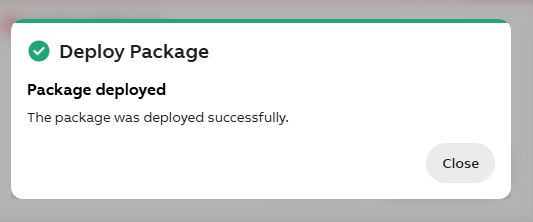
On clicking on the Deploy button user can see ABB Ability™ History package being deploy don't close the browser during the deployment progress, once deployment is successful user can see a message
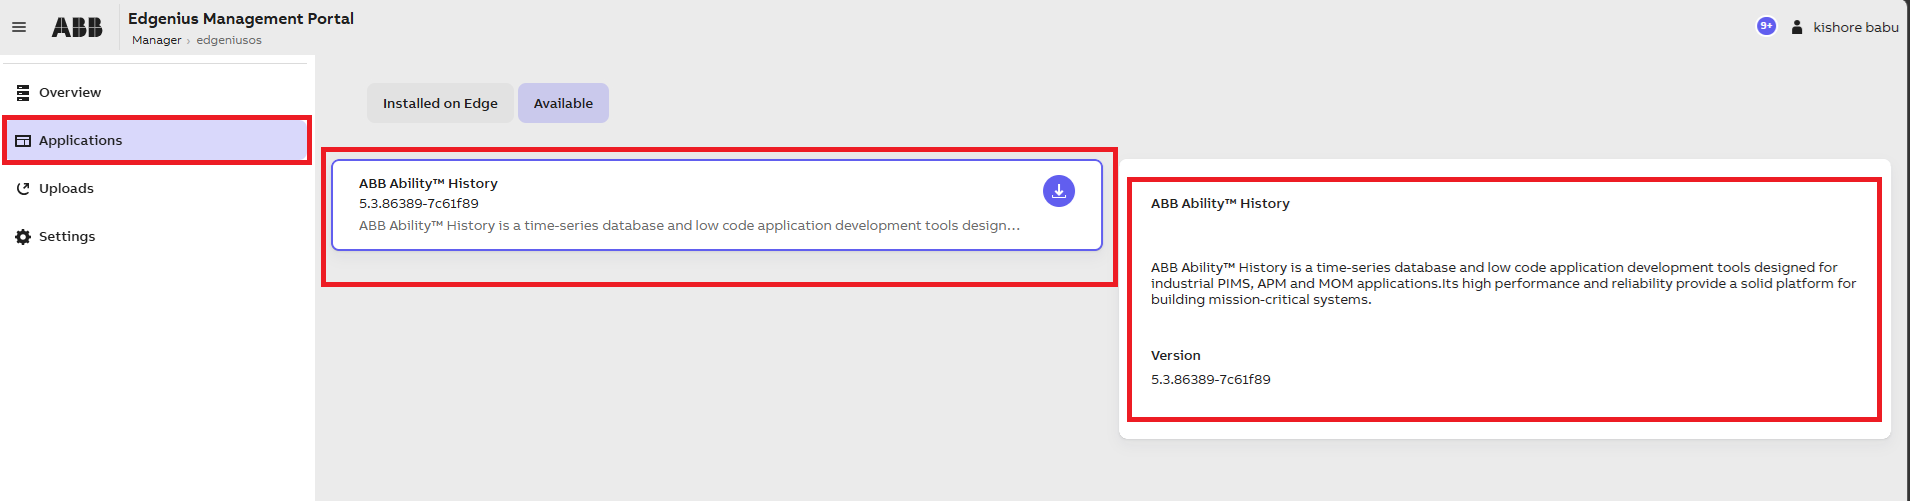
Navigate to the Applications page from the left navigation menu. This page displays all application packages that are available for deployment on the Edge device.
The Available tab lists application packages that have been uploaded to the portal but are not yet installed on the selected Edge device.
Each application card shows the application name, version, and a brief description. Users can click the Download/Install icon to deploy the selected application.
When an application is selected, the Application Details panel on the right displays additional information, including the application description and version details, helping users verify the package before deployment.
Pre-Installation:
(This section is not needed from Edge OS version 4.0 and above)
Config Map creation:
Before installing the ABB Ability™ History application, the Cluster Root CA certificate must be made available in the target namespace as a ConfigMap. This ConfigMap is used by the application's init-host-ca-certs container to install the trusted CA certificates during pod startup.
Open a terminal on the Edge Host and create a new file by running the following command:
sudo nano create-root-ca-configmap.shCopy and paste the script provided below into the file. After pasting the contents, press Ctrl+O to save the file, press Enter key to confirm the file name, and then press Ctrl+X to exit the editor.
#!/bin/bash

set -euo pipefail

NAMESPACE="cpmplus"
SECRET_NAME="abb-ics-sys-certs-ingress-root-ca"
SECRET_NAMESPACE="cert-manager"
CONFIGMAP_NAME="abb-ics-sys-certs-ingress-root-ca-cm"

echo "Creating namespace '${NAMESPACE}' if it does not exist..."
kubectl create namespace "${NAMESPACE}" --dry-run=client -o yaml | kubectl apply -f -

TMP_CERT=$(mktemp)

echo "Extracting certificate from secret '${SECRET_NAME}'..."
kubectl get secret "${SECRET_NAME}" \
  -n "${SECRET_NAMESPACE}" \
  -o jsonpath='{.data.tls\.crt}' | base64 -d > "${TMP_CERT}"

echo "Creating/Updating ConfigMap '${CONFIGMAP_NAME}'..."
kubectl create configmap "${CONFIGMAP_NAME}" \
  --from-file=ca.crt="${TMP_CERT}" \
  -n "${NAMESPACE}" \
  --dry-run=client -o yaml | kubectl apply -f -

rm -f "${TMP_CERT}"

echo "Verifying ConfigMap..."
kubectl get configmap "${CONFIGMAP_NAME}" -n "${NAMESPACE}" -o yaml

echo "Completed successfully."
Make the script executable:
Grant execute permission to the script so that it can be run directly from the command line using the following command:
sudo chmod +x create-root-ca-configmap.shRun the Script:
Execute the script to create the cpmplus namespace and the required ConfigMap.
Run the following command:
sudo ./create-root-ca-configmap.shUpon successful execution, the script creates the cpmplus namespace (if it does not already exist) and creates or updates the abb-ics-sys-certs-ingress-root-ca-cm ConfigMap within that namespace.
The script also displays the ConfigMap details, allowing you to verify that the Cluster Root CA certificate has been successfully added and is available for use by the ABB Ability™ History application during pod initialization.
ImportantAbove step is mandatory for edge 3.3 OS, the ABB Ability™ History application pods will not be deployed successfully unless the abb-ics-sys-certs-ingress-root-ca-cm ConfigMap is available in the cpmplus namespace. The application's init-host-ca-certs container depends on this ConfigMap to install the trusted Cluster Root CA certificates during pod startup.
Installation:
To begin the installation, click the down arrow (Install) icon associated with the application.

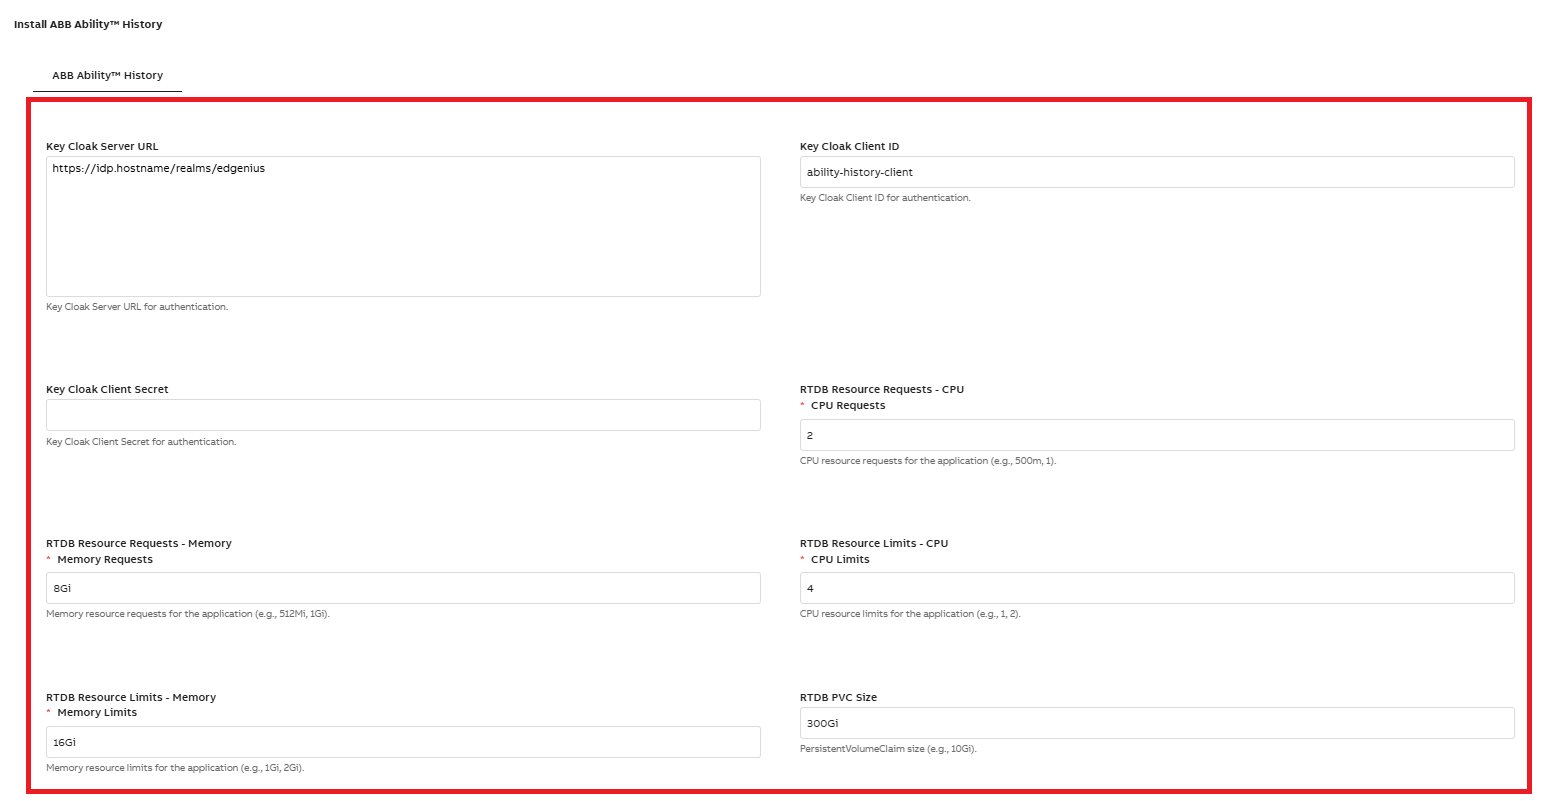
The system then displays an installation dialog where users can review and provide the required configuration values, as shown in the screenshot below.
The installation dialog allows users to enter or override specific deployment settings before proceeding with the application installation.
Keycloak Server URL: Specify the Keycloak server URL that the application uses for user authentication and authorization. Ensure that the URL points to the correct Keycloak realm.
Keycloak Client ID: Enter the Keycloak Client ID configured for the ABB Ability™ History application. This client ID is used by ABB Ability™ History when communicating with Keycloak for authentication.
Keycloak Client Secret: Enter the client secret associated with the configured Keycloak Client ID. The application uses this secret to securely authenticate with the Keycloak server and obtain access tokens for user authentication and authorization.
Note: Sensitive fields reset to empty when updating app settings causing key-cloak login failure - This is a bug in Edge 3.3 and fixed in 4.0 , as a work around user need to re-enter the key-cloak secret if there is any configuration change to the Ability History Installaiton.When modifying settings of an installed application (such as updating container limits), sensitive fields like passwords are unexpectedly reset to empty values, causing containers to restart with invalid credentials.
RTDB Resource Requests - CPU: Specify the minimum CPU resources requested for the RTDB application (for example, 2 CPUs).
RTDB Resource Requests - Memory: Specify the minimum memory resources requested for the RTDB application (for example, 8Gi).
RTDB Resource Limits - CPU: Define the maximum CPU resources that the RTDB application can consume (for example, 4 CPUs).
RTDB Resource Limits - Memory: Define the maximum memory resources that the RTDB application can consume (for example, 16Gi).
RTDB PVC Size: Specify the size of the Persistent Volume Claim (PVC) used for RTDB data storage (for example, 300Gi).
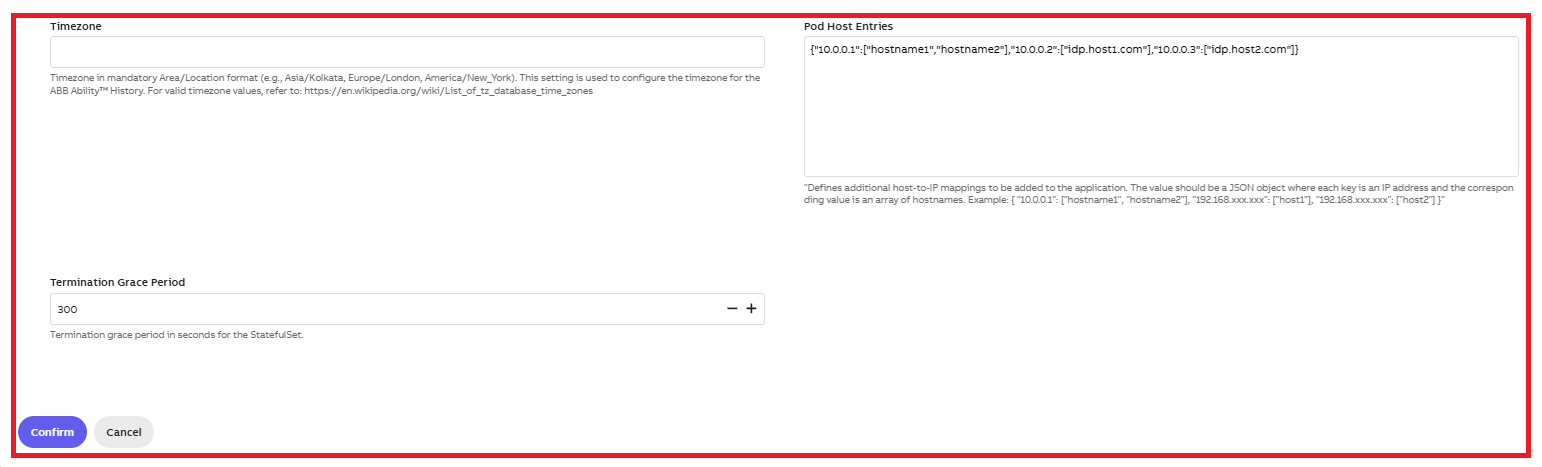
Time Zone: Specify the time zone used by the application. Enter the time zone in Area/Location format, for example, Asia/Kolkata. For other time zone settings, refer to: https://en.wikipedia.org/wiki/List_of_tz_database_time_zones#List
Pod Host Entries: Defines additional hostname-to-IP address mappings that will be added to the application pods. Use this field to provide custom host resolution when DNS entries are unavailable or need to be overridden.
ImportantEntries for the Keycloak server are mandatory and must be included to ensure successful authentication. In addition to the Keycloak entries, users may add any other required host name mappings for their environment. Additional host entries can be added as needed using the same format.
Example:
In this example:

idp.<hostname> resolves the Keycloak server hostname.
<hostname> resolves the application host name.
10.0.0.1 should be replaced with the IP address corresponding to these hostnames in your environment.
if you need multiple dns name for same IP you can pass it as in the example for keycloak (as array). Dont make additional entry for same IP.

entries host1, host2 are examples to add additional host details

(note: these additional entries can be added at later point during runtime as rquired and click apply)

{
  "10.0.0.1": [
    "idp.<hostname>",
    "<hostname>"
  ],
 "192.168.xxx.xx1": ["host1"
  ],
 "192.168.xxx.xx2": ["host2"
  ]
}
Termination Grace Period: Specifies the amount of time, in seconds, that Kubernetes allows the application to shut down gracefully before forcibly terminating the pod. The default value is 300 seconds.
ImportantSpecifies the amount of time Kubernetes allows a pod to shut down gracefully before it is forcefully terminated. Configuring an appropriate termination grace period helps prevent data loss, incomplete transactions, and service disruptions during pod restarts, upgrades, or scaling operations.
NoteReview these settings carefully before proceeding with the installation, as they determine the deployment configuration and runtime behavior of the ABB Ability™ History application.
How to check if ABB Ability™ History application is installed ?
Connect to the Edge Machine using SSH. Before running any OpenShift (oc) commands. Review the output and ensure that all ABB Ability™ History pods are in the Running state and that all containers are Ready.
NoteIt is recommended to run all oc commands with sudo to ensure the necessary permissions are available.
# Run below command with
ssh [email protected] - IP of Edge Host machine
# Enter the password of the user whenever prompted
# Run below command to check if ABB Ability™ History pods are running

sudo oc get pods -n cpmplus
NAME                    READY   STATUS    RESTARTS   AGE
abb-ability-history-0   1/1     Running   0          3m47s

# Run below command to check the pod logs
sudo oc logs abb-ability-history-0 -n cpmplus

# Run below command to check the route name
sudo oc get route -n cpmplus
NAME                        HOST                                ADMITTED   SERVICE                   TLS
abb-ability-history-m9gwb   <EdgeName>.abb-ability-history   True       abb-ability-history-svc
Host Entries in the Client Machine for Accessing View and History Applications
To access the ABB Ability™ History application from a client machine, ensure that the machine's host file contains entries for both:
The Keycloak DNS name configured in the earlier steps.
The ABB Ability™ History application DNS name.
Add the following entry to the client machine's host file:
<IP-Address>    <EdgeName>.abb-ability-history

IP-Address is the IP address of the Kubernetes node hosting the application.
EdgeName is the hostname of the Edge device or node.
ImportantBoth the Keycloak and ABB Ability™ History DNS entries must be resolvable from the client machine. If the required host entries are missing or incorrect, users may be unable to access the application or authenticate successfully through Keycloak.
192.168.xxx.xxx idp.edgeniusos
192.168.xxx.xxx management.edgeniusos
192.168.xxx.xxx edgeniusos.abb-ability-history

Where:
idp.edgeniusos provides access to the Identity Provider (Keycloak) portal.
management.edgeniusos provides access to the Edgenius Management Portal.
edgeniusos.abb-ability-history provides access to the ABB Ability™ History application.

Note: Replace 192.168.xxx.xxx with the actual IP address of the Edge node. All hostnames must resolve to the same Node IP to ensure successful access to the deployed services.
After updating the host file, save the changes and verify that the hostnames can be resolved from the client machine before attempting to access the application.
How to access ABB Ability™ History applications
After the application deployment is complete, the following URLs can be used to access the ABB Ability™ History applications:
Engineering UI:
https://<EdgeName>.abb-ability-history/history/View Application:
https://<EdgeName>.abb-ability-history/view/Authentication:
When accessing either URL, users are redirected to the Keycloak login page for authentication.
Log in using a Keycloak user account that has been assigned to the rtdbadmin group. Only users with the appropriate permissions can access and manage the ABB Ability™ History applications.
Troubleshooting: If the login page does not appear or authentication fails:
- Verify that the Keycloak server is accessible.
- Confirm that the Keycloak DNS entry is correctly configured in the client machine's host file.
- Ensure the user account is a member of the rtdbadmin group.
- Verify that the ABB Ability™ History application pods are in the Running state.
- Confirm that the application URL resolves correctly from the client machine.
Post Install Steps
Provide Database Node Size:
At the time of writing this document (08/2026) there are some settings which needs to be manually altered after the Kubernetes deployment of ABB Ability™ History is done in Edge OS. To use the database table auto adjust size feature we need to create an entry to Simple config as follows
-
Launch the View/Engineering UI.
-
Search for Simple Config and open the item listed under Dashbord category

-
In the dashboard opened, click on Edit followed by New (at the bottom left of the display)


-
On Clicking the
Newbutton a new empty row will be inserted at the end of the list, Provide following details
Section: Database
Key: SizeInGB
Value: Max 80% of the Size Provided for RTDB PVC Size during installation of ABB Ability™ History
(Example: If 100Gi is provided for RTDB PVC Size then the value in simple config should be 80)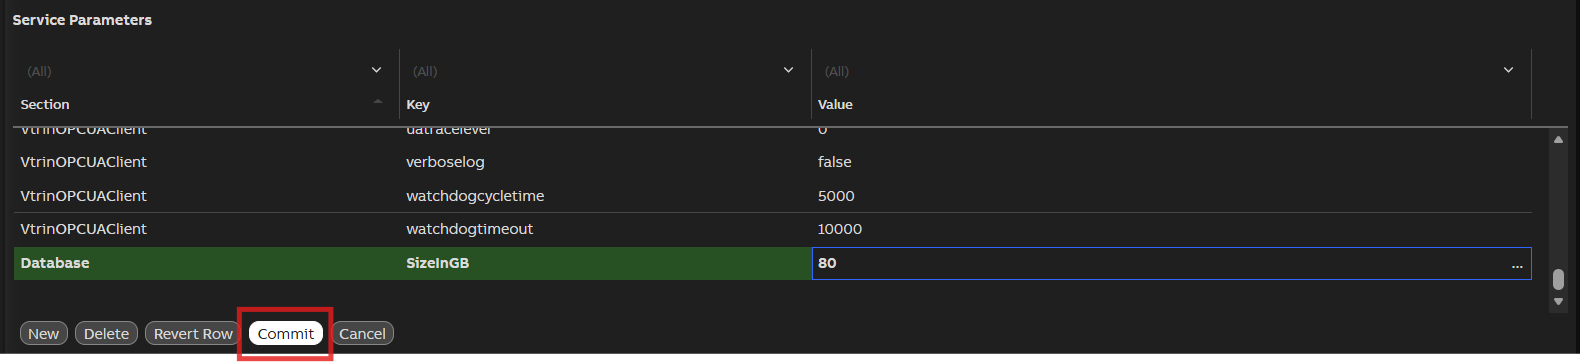
Click on Commit and acknowledge the confirmation message popup
Create Aggregate Tables
(Obsolete!! This section is not needed anymore - 15 Oct 2026)
ABB Ability™ History supports some standard aggregation and store the data to corresponding dedicated tables. Those tables are not part of Edgenius based deployment at the time of writing this document (08/2026). To get those tables created in the deployment below is the step that needs to be followed as a post install step.
Caution:When the below script is executed, the History retention period is changed to a lesser value than the default 30 years. Be cautious while running it on an already installed machine.
sudo oc exec -it abb-ability-history-0 -n cpmplus -- praox -constr "driver=RTDB Core;dbq=/var/lib/rtdbdata" -script "/usr/share/cpmplus/config/RTDB_Create_Production_Database.sql"Troubleshooting:
If any of the ABB Ability™ History pods are not in the Running state after installation, perform the following checks:
# Enter password whenever prompted
# Verify the status of all pods in the cpmplus namespace:
sudo oc get pods -n cpmplus

# Review the details of the affected pod to identify any events or error messages:
sudo oc describe pod <pod-name> -n cpmplus

# Check the logs of the application container
sudo oc logs <pod-name> -n cpmplus

# If the pod is stuck in the Init state, review the logs of the init containers
sudo oc logs <pod-name> -n cpmplus -c init-host-ca-certs

# Verify that the mandatory abb-ics-sys-certs-ingress-root-ca-cm ConfigMap exists
sudo oc get configmap abb-ics-sys-certs-ingress-root-ca-cm -n cpmplus

# Check the StatefulSet status:
sudo oc get sts -n cpmplus
sudo oc describe sts abb-ability-history -n cpmplus- Keycloak Server URL
- Keycloak Client ID
- Keycloak Client Secret
- Required Keycloak host entries in Pod Host Entries
Verify that sufficient cluster resources (CPU, memory, and storage) are available for the application pods.
Known Issues
| Issues / Behaviour | Workarounds, Clarifications, and Helpful Hints |
|---|---|
| When ABB Ability™ History is uninstalled from the Edge Management Portal, the associated namespace and Persistent Volume Claim (PVC) are retained by design. In order to prevent accidental data deletion. | The retained namespace shall be deleted manually using the below commandsudo oc delete namespace cpmplus |
| When an Ability History installation fails for some reason, a subsequent deployment performed after uninstalling from edge portal may reuse retained resources in the namespace and fail again. For example, This can occur when PVC provisioning fails due to insufficient storage capacity available on the node | After uninstalling the failed deployment, manually delete the retained namespace before redeploying the application. Use the following command to delete the namespace sudo oc delete namespace cpmplus |
| Reducing the PVC (Persistent Volume Claim)size after deployment is not supported | To use a smaller PVC size, uninstall the application, delete the existing PVC, and redeploy the application with the required storage size configured. Ensure that any required data is backed up before removing the storage resources. |
| An abrupt shutdown of the node may result in corrupted database tables. During subsequent startup, the system scans all tables and repairs any corrupted tables before starting the ABB Ability™ History services. This recovery process may increase the startup time of History, depending on the size of the database. | It is always recommended to perform a graceful shutdown of the node to prevent database table corruption. |
| Sensitive fields are reset when application settings are updated in Edge 3.3. When modifying an installed ABB Ability™ History application, for example, changing container resource limits, sensitive fields such as the Keycloak Client Secret may be reset to empty. This can cause the application containers to restart with invalid credentials and result in Keycloak login failure. | Edge 3.3: Whenever the ABB Ability™ History installation configuration is changed, re-enter the Keycloak Client Secret before applying the changes. This issue is fixed in Edge 4.0 version |
Updated 1 day ago