Part 3 - Calculations
After configuring our equipment models we can move on to our calculation tool. This can be found in Calculations > Catalog.
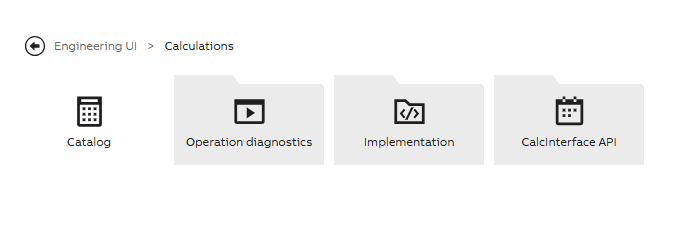
Code adding tool is in Calculations and Catalog menu
In calculation code we use C# as the coding language and the code editor contains a class with a single method. The code reads the existing time-series data and writes the generated data using input and output parameters we have defined.
Cookie Production Line example settings
For demo purposes we have created the property values ourselves and did two calculations to create a working batch job monitoring system (one simulator calculation and one batch job calculation).
Calculation definitions
Settings needed to configure for a working calculation:
- Calculation name
- Trigger (defines how and when calculation should run)
- Calculation period (if there is no need to define this separately, this can be same as scheduler trigger)
- Data Mappings (define output and/or input parameters)
- Code
First calculation - Process Simulation
In our application example we have implemented the process simulator also as a calculation, but we don't present the details here, because it is irrelevant in the real use case.
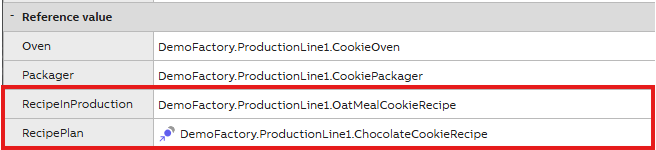
Worth mentioning is however our recipe and production plan, for which we have created the GUID properties RecipeInProduction and RecipePlan. We have briefly explained below how we handle these in our simulation calculation.
Writing values to historized GUID in calculation
In calculation to write a value from one historized GUID to another, we could do it like this:
CCLine.RecipeInProduction.CurrentValue = CCLine.RecipePlan.First.Value;Then in our model they would appear like this:
However, this is yet not available in our calculation tool for historized GUIDs, so before this is implemented, we have to do this with Vtrinlib update and fetch. Code example shown below.
var pc = this.Driver.Classes["Path"].Instances;
var pl1 = pc["DemoFactory.ProductionLine1"];
var np = pl1.BeginUpdate();
var gfp=ABB.Vtrin.Drivers.cGraphFetchParameters.CreateRawFetch(Driver.Classes["EquipmentHistory"], "FIRST1MIN", DefaultPeriod.Start, DefaultPeriod.Start, int.MaxValue, "Path=? AND Property=?", pl1, "RecipePlan");
var gdata=Driver.FetchGraphData(gfp);
WriteLine("This is new: " + gdata.Exception);
np.SetRawPropertyValue("RecipeInProduction", gdata[0].Value);
np.CommitChanges();
As shown above we are now able to write the recipe ingredient amounts according to the recipe that is in production. For clarification, we have added these below.
Mixer.Butter.Amount.WriteValue(CCLine.RecipeInProduction.Butter.First.Value, DateTime.UtcNow);
Mixer.Sugar.Amount.WriteValue(CCLine.RecipeInProduction.Sugar.First.Value, DateTime.UtcNow);
Mixer.Egg.Amount.WriteValue(CCLine.RecipeInProduction.Egg.First.Value, DateTime.UtcNow);
Mixer.Flour.Amount.WriteValue(CCLine.RecipeInProduction.Flour.First.Value, DateTime.UtcNow);

Mixer.Chocolate.Amount.WriteValue(CCLine.RecipeInProduction.Chocolate.First.Value, DateTime.UtcNow);
Mixer.PeanutButter.Amount.WriteValue(CCLine.RecipeInProduction.PeanutButter.First.Value, DateTime.UtcNow);
Mixer.Oatmeal.Amount.WriteValue(CCLine.RecipeInProduction.Oatmeal.First.Value, DateTime.UtcNow);
Batch job calculation
After defining values and monitoring system logic, we create a calculation for tracking our production batches. This is done by making the calculation run in batch mode.
Trigger
For this calculation we defined event based trigger and chose cookie batch id as the triggering event. This means that when the cookie batch id changes, the calculation activates, iterates the code once and writes values to defined properties. Now our batch calculation runs only once per production batch.
Enable batch job
In addition, we enabled batch job on the calculation settings and we chose cookie batch id as as the batch indicator. With this setting the calculation starts working in batch mode and separates production batches every time the cookie batch id changes. See our example below. When setting the batch indicator, Class Name and Where String values are written in the same way as for data mapping (including Path_ and Name='').
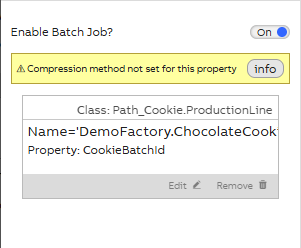
Batch job enabled on calculation settings
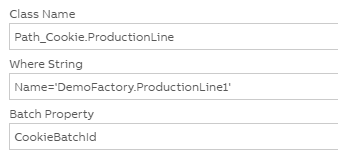
Batch indicator definitions for equipment property
Code
In our batch code we define sum and average values of our production batch. Total raw material values for each batch are updated to pricetotal and amounttotal columns. Besides these, average temperatures of mixer and packager will be monitored during each batch and updated accordingly (averagepackagertemperature for packager and averagetemperature for mixer ).
In our example total and average values are gathered as shown below in the code example. .Sum gathers property data from the last ended calculation period (which in our case is the production time of one batch) and updates the summary to given property value. The .Avg calculates the average of the temperature fluctuations.
CCBatchLine.Mixer.Sugar.AmountTotal.CurrentValue = CCBatchLine.Mixer.Sugar.Amount.Sum;
CCBatchLine.Mixer.AverageTemperature.CurrentValue = CCBatchLine.Mixer.Temperature.Avg;
The CCBatchLine. in the beginning refers to the output property name given when setting output parameter. You may choose a name that is most convenient, but keep in mind that this may not include the equipment model name.
VtrinLib method for writing to Equipment Event class
We use Equipment Event class to register data on the production batches. This is a flexible class to store any key-value pairs to a single event row that now represents one production batch.
For our daily production report we are creating a log type datalist and, as this will have quite many rows with daily key figures, we are using the Equipment Event as source in this. For our example we created "Event Attribute Types" where we store our Equipment property values.

Event Attribute Types of our example
Adding attributes to EquipmentEvent class can be done automatically or manually. Automatic adding is more safe, but for demo purposes, we added these manually in order to define Product ID and Indexes. We did this by logging in Vtrin and adding these to Language Strings. Our VtrinLib example code is shown below.
var newEvent = this.Driver.Classes["EquipmentEvent"].Instances.Add();
newEvent["BatchPeriodStart"] = PL.ProductionStart.CurrentValue.Value;
newEvent["CookieBatchId"] = PL.CookieBatchId.Last.Value;
newEvent["BatchPeriodEnd"] = PL.ProductionEnd.CurrentValue.Value;
newEvent.CommitChanges();
If we did added this automatically, we could do this in our Calc Catalog code editor by adding and defining attributes. Generic code example shown below. In this case however, no product id will be added and index will be set automatically. More VtrinLib code examples can be found here.
var attributes=new System.Collections.Generic.Dictionary<string, object>();

attributes["BatchPeriodStart"]=batchStart;
newEvent["Attributes"]=attributes;

newEvent.CommitChanges();
Running calculation
After committing code and saving changes the calculation will start working in batch mode and is triggered every time the cookie batch id changes: Every time the value of cookie batch id changes the calculation will know that a new batch production has started and separates batches based on the id number.
Now, when we next look at the user interface monitors, we are able to track and monitor changes in production properties. If needed, we can select a certain cookie batch and check for example the material ids, amounts, prices and machine temperatures. This allows us to also detect possible malfunctions or efficiency in our production line (e.g. wrong material amounts, too low or too high temperatures).
We will look into these in the last part User interface.
More information on calculation tool?See calculation tool documentation: Concepts
Using calculation tool in Engineering UI: Calculation tutorial